What is Adobe Lightroom?
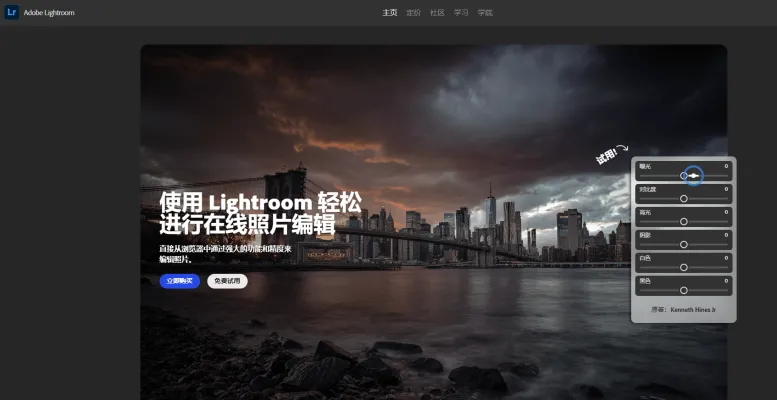
Adobe Lightroom is a powerful image organization and editing software developed by Adobe Systems, primarily aimed at professional photographers and photo enthusiasts. It allows users to import, save, view, and organize large collections of digital images seamlessly. A standout feature of Lightroom is its non-destructive editing capability, which means original files remain untouched while users can experiment with various edits and adjustments.
Lightroom offers a comprehensive suite of tools for photo enhancement, including color correction, tone adjustments, and advanced features like spot removal and graduated filters. It also allows for efficient photo management through tagging and metadata editing. Available as part of Adobe's Creative Cloud, Lightroom operates on multiple platforms including Windows, macOS, iOS, and Android, making it accessible for users on the go.
Additionally, Lightroom Classic focuses on desktop workflows with local storage, while the cloud-based version enables cross-device access and collaboration. Overall, Lightroom is essential for photographers seeking a streamlined approach to photo editing and organization.
Use Cases of Adobe Lightroom
Here are some key use cases for Adobe Lightroom, with explanations:
- Photo Organization and Management: Lightroom excels at helping photographers organize large collections of images. Its catalog system allows you to import, tag, rate, and sort thousands of photos. You can create collections, use keywords, and filter images to quickly find what you need.
- Non-Destructive Editing: Lightroom's editing is non-destructive, meaning your original files are never altered. You can make adjustments to exposure, color, tone, etc. and easily revert changes or create multiple versions without duplicating files.
- Batch Processing: The ability to synchronize edits across multiple images is a huge time-saver. You can apply the same adjustments, presets, or metadata to entire shoots with just a few clicks.
- RAW File Handling: Lightroom is optimized for working with RAW files from cameras. It can apply lens corrections, reduce noise, and extract maximum detail from RAW data better than most other software.
- Publishing and Exporting: Lightroom makes it easy to export optimized images for print, web, or social media. You can create export presets to quickly output images at specific sizes and formats.
How to Access Adobe Lightroom
To get started with Adobe Lightroom, follow these simple steps:
Step 1: Download Lightroom
- Visit the Lightroom Website: Go to lightroom.adobe.com to access the official site.
- Choose Your Version: Select between desktop, mobile (iOS or Android), or web versions based on your device preferences.
Step 2: Install the Application
- Download the App: Click on the download link for your respective platform (Windows, macOS, iOS, or Android).
- Follow Installation Prompts: Once downloaded, follow the on-screen instructions to install Lightroom on your device.
Step 3: Create an Adobe Account
- Sign Up: If you don't have an Adobe ID, you can create one by clicking on the "Sign Up" option on the app or website.
- Fill in Your Details: Provide the required information, such as your email address and password, to set up your account.
Step 4: Sign In
- Open the App: Launch Lightroom on your device.
- Log In: Enter your Adobe ID and password to sign in. You can also use options like Google or Facebook for quick access.
Step 5: Start Editing
- Explore the Interface: Familiarize yourself with the workspace and tools available.
- Import Photos: Begin by importing your photos to organize and edit them as desired.
By following these steps, you will have full access to Adobe Lightroom and can enjoy its powerful photo editing capabilities.
How to Use Adobe Lightroom
Adobe Lightroom is a powerful photo editing and management tool. Follow these steps to get started:
- Install Lightroom: Sign up for a subscription on the Adobe website or start a free trial. Download and install the software.
- Import Photos: Open Lightroom and click on the "Import" button. You can select photos from your camera, hard drive, or mobile device. Use the "Copy" option to create duplicates in your Lightroom library.
- Organize Your Library: Use collections, keywords, and ratings (1-5 stars) to sort and categorize your images. This helps in quickly finding specific photos later.
- Edit Photos: Select a photo and navigate to the "Develop" module. Use sliders under sections like Basic, Tone, and Color to adjust exposure, contrast, and saturation.
- Apply Presets: Under the "Presets" panel, choose from pre-made styles or create your own to quickly apply desired effects to your photos.
- Export Your Edits: Once satisfied with your edits, go to File > Export. Choose your export settings (file type, size, etc.) to save or share your edited images.
By mastering these basic steps, you'll be well on your way to enhancing your photography with Adobe Lightroom.
How to Create an Account on Adobe Lightroom
Creating an account on Adobe Lightroom is a straightforward process. Follow these steps to get started:
- Visit the Adobe Lightroom Website
- Click on "Sign In"
- Select "Create an Account"
- Fill Out the Registration Form
- Agree to the Terms and Conditions
- Verify Your Email
- Start Using Lightroom
By following these steps, you can easily create an account and start enhancing your photography experience with Adobe Lightroom.
Tips for Adobe Lightroom
- Use Keyboard Shortcuts: Familiarize yourself with shortcuts like pressing R for the crop tool and Y for before-and-after comparisons. This will speed up your editing process.
- Batch Editing: When working with multiple images taken in similar lighting conditions, use the Sync Settings feature to apply adjustments across your selected photos simultaneously.
- Presets: Leverage Lightroom's presets for quick edits. Customize or create your own to maintain a consistent editing style across your portfolio.
- Smart Previews: Enable Smart Previews to edit images while offline, which can help maintain a smooth workflow when you're not connected to your main image library.
- Auto Masking: When using the Brush tool, enable Auto Mask to prevent edits from spilling over into unwanted areas, making precise adjustments easier.
- Color Grading: Experiment with color grading to add creative tints to your images, enhancing the mood and overall aesthetic.
By integrating these tips into your Lightroom routine, you'll streamline your photo editing process and achieve better results. Happy editing!


